Adding a task
The easiest way to add a new task is just start typing in the Add a task field.

Or click on the New Task button from the toolbar. This adds a task to the root of a currently active list.

If you need to create a child or sibling task then click on arrow button next to New Task and select Add as Child or Add as Sibling option.

The first option adds a child task to the currently selected task and the second one adds a task at the same level as the currently selected one.
New tasks can also be created under Actions -> New Task.
You can also double click on an empty space in the Task module to open the New Task dialog window. More details can be found in the Editing a Task topic.
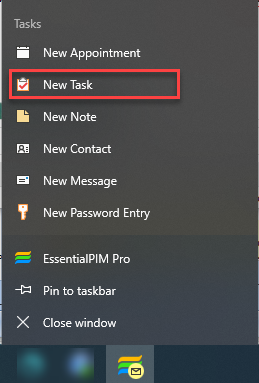
EssentialPIM allows you to add a new task quickly even when it is minimized. This can be done by right-clicking on the EssentialPIM icon in the taskbar and selecting the "New Task" option from the menu that appears.
|
Shift+Ctrl+O - global shortcut to create a Task (works even when EssentialPIM is running in the background). |
Tasks Lists
Tasks can be organized into multiple lists, displayed in the right panel. By default, all new tasks are added to List 1. To create another list, click Add List at the end of the panel. This opens Add List dialog.
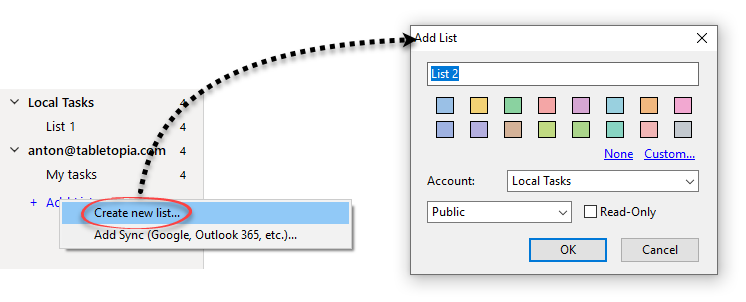
In this dialog you can define:
Name and Color — set the list’s name and assign a color for easier identification.
Account — choose the account in which the list will be created. By default, it’s Local Tasks.
Status — set the list as Private or Public. In EssentialPIM Pro Business, public lists are also used for assigning tasks to other users. (See Assigning items topic for more details.)
Read-Only — when enabled, all tasks in the list become read-only.
Once created, a list can be edited later through the right-click menu by selecting Properties.
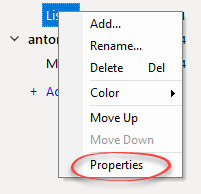
The right-click menu also allows you to:
Add — create a new list.
Rename — change the name of the current list.
Delete — remove the current list along with all its tasks.
Color — change the tab color.
Move Up/Down — adjust the list’s position in the panel.
|
Lists order can be changed with drag & drop. |
Managing Tasks
Tasks can be organized into hierarchical structures. Creating child or sibling tasks was described earlier, but you can also change the arrangement of existing tasks. The fastest way is to drag & drop a task to a desired location.
You can also move tasks in the tree by using the corresponding buttons from the tool bar.
![]()
Arrow buttons move selected task(s) across the tree.
![]()
Collapse All and Expand All buttons allow to expand or collapse the entire tree with just a single click.
Task position within the hierarchical structure can be set from the task info dialog.
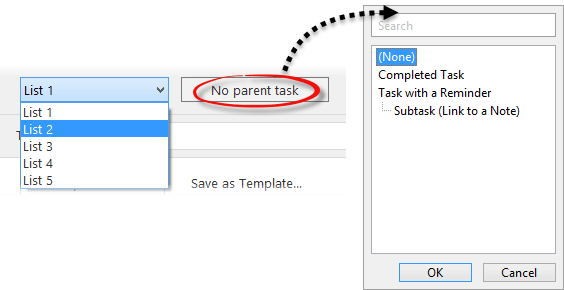
Here you can select a tasks list and a parent record.
|
Following shortcuts can be used to manage the tree structure: |
EssentialPIM allows working with tasks while you are in the Calendar module. The Tasks bar is shown to the right of the Calendar and can be turned on/off in View -> Tasks Bar.
Tasks can be also displayed in the Calendar along with appointments. There are several ways to do this:
Show in Calendar option. Shows a task in the Calendar as if it were an event. Such tasks have a corresponding icon near their subjects. You can work with such tasks the same way as if they were appointments. Open, edit and drag & drop operations are supported. All changes are automatically reflected in the Tasks module, as well. Enable this option by right clicking on a task or under Actions -> Show in Calendar, or in the task edit dialog.
Save as Appointment option. Creates an appointment in the Calendar with the same settings as the source task but, unlike the Show in Calendar option, the source task and resulting appointment are not related to each other anymore. Enable this option by right clicking on a task or under Actions -> Save as Appointment.
|
Ctrl+К - shortcut for the Show in Calendar option. |
Tasks Module Settings
Change task module settings in Tools -> Options -> Tasks
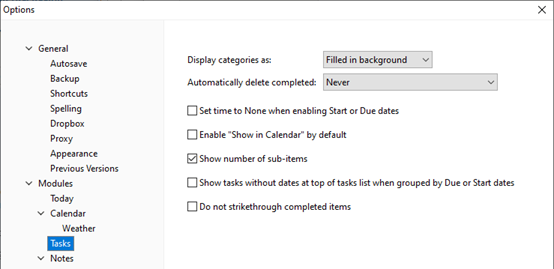
Display categories as - displays categories a variety of ways in the list view.
Automatically delete completed - moves completed tasks into Trash.